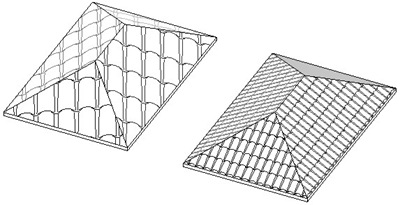
Sure! Image above is actually plotted from Revit sheet. You can apply surface pattern to your roof family for this purpose.
Open your roof type properties, edit the material. Duplicate any material from the list, rename it. Now we will apply pattern to this material.
Understanding Pattern
Surface and Cut Pattern
If you have no idea what’s the difference between surface and cut pattern, lets discuss about this first. When defining your material, you should be able to set these two type of pattern.
Cut pattern will only show if you cut an object, while you can see surface pattern on the object’s surface. Cut patterns are usually used to show objects materials. For example, ceiling pattern is a surface pattern and brick pattern is a cut pattern.
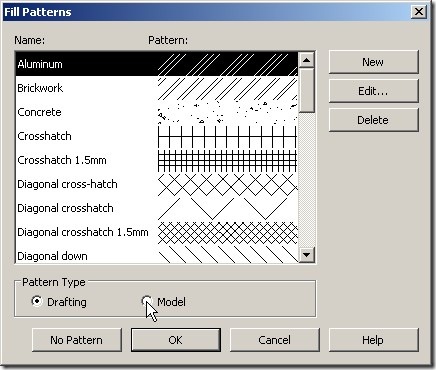
So, we’ll use surface pattern for our roof. Click ‘…’ next to dropdown box on surface pattern area.
Drafting and Model Pattern

Now, you should aware about drafting and model pattern. What is the difference?
- Drafting pattern is used to represent materials in your drawings. The scale and orientation will be fixed to your drawing sheet.
- Model pattern represents actual pattern in your model. For example, ceiling pattern, wall pattern, and of course roof pattern.
Use existing pattern, we will learn about using custom pattern later.

Roof on the left using drafting pattern at scale 1:50, and roof on the right using model pattern. Compare to scale 1:100 below.

Using AutoCAD Pattern
Now, you should realize that Revit doesn’t have roof pattern. You can import AutoCAD pattern to add more pattern. Doesn’t have AutoCAD roof pattern? Don’t worry, you can download them here.You can’t use AutoCAD pattern directly. You have to add a line in your pattern file. Open the pat file, you can use notepad to edit this file. Add this directly below the pattern name.
Save your pattern file.
;%TYPE=MODEL

Now, back to Revit. In the fill pattern dialog box, click new. Click custom for this new pattern. Click import to define your custom pattern. Select your pattern file that you have edited.

Now you should have seen your pattern preview. Adjust the scale if necessary, especially if you are working using metric.
Click OK until all dialog boxes are closed. That’s all
Written by cad-notes.com
No comments:
Post a Comment